How to do it step by step
1st Step:
Selecting the location
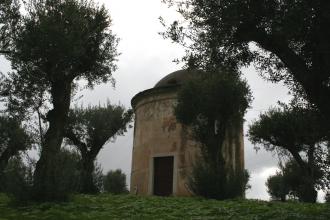
Selecting the right, proper and adequate location is crucial to the success of the installation. So, it is essential to ensure that the three aspects involved (the MDG topic, the method and approach, and the right location in the museum) complement each other and that the relationship between them is clear to the visitor. If possible, a spot off the beaten track should be chosen, one that is still underutilized by the museum, to add value to the installation and, at the same time, provide new challenges that help develop the museum’s educational services. In this case, we took into account the fact that the museum is located at a former 16th century convent, which has a number of additional buildings. We took the decision to bring alive the ancient dovecote, which has unique features providing a balanced approach to the three essential aspects of "Topic-Method-Location".
Note: Take photographs of the site and take the necessary measurements. Both will become essential at a later stage.
2nd Step:
Brainstorming
Once the installation location is identified, you need to decide on the type of installation/approach you want to implement, which in our case was an insect supermarket. Therefore, it was necessary to define the details of the installation with reasonable precision. To facilitate this, the project team worked on the various stages of the process inside the dovecote itself, since it was easier to discuss our ideas inside the actual space to be used.
Firstly, we needed to assess how many pigeon holes were available and their respective sizes (they were all different sizes!). Secondly, a SWOT (strengths, weaknesses, opportunities, threats) matrix was drawn up to identify clearly the advantages and disadvantages of using the space. This matrix enabled the main obstacles to be identified and, from the beginning, the best solutions to be sought. The main advantage was the use of an emblematic place where creativity could be an asset, while the issue of access was clearly a major drawback.
Note: doing this SWOT analysis is a great way to find a set of effective solutions for problems faced during the process of implementing an installation.
Then, the project team met with the designers and presented the idea to them: building an insect supermarket where visitors have the opportunity to touch and taste some of the insects, as well as a range of products, and, of course, where visitors can reflect on the overall theme; a site with complementary information that is visually attractive.
3rd Step:
What kind of products to choose?
Informational products
In addressing the issue of food, and more specifically insects, we needed to ensure that information was given in a way that did not distance the visitors from the subject and, above all, that did not lead to disgust at the subject. It is definitely not the case that most people consider it acceptable to eat insects in the first instance. Therefore, it is necessary to show that insects can be nutritious and perhaps provide an energy supply for a growing population and a credible environmental solution.
Insects
On the subject of insects, the project team had to create some expectation about the installation. Through engaging the five senses, the team wanted to reinforce the idea that insects are not grotesque. How could we do this whilst observing hygiene and safety rules and taking into account the museum space in question?
We needed to gather as many ideas and concrete proposals as possible, and to compare and test the types of information we wanted to provide.
4th Step:
Timeline
The project team then defined the need to contact potential suppliers suited to working on this topic who could add value. It was important to keep our feet firmly on the ground and to analyse what we could and could not do, given the physical and financial resources at our disposal. Equally important was synchronising the timing of all aspects involved in the project, as well as the launch of the installation and communicating it to the general public.
5th Step:
All that we want to say and do
What shall we say?
After identifying the type of installation you want to develop and the place where you want to implement it, it is necessary to take your time to reflect on the message that you want to transmit.
Research
In order to have correct and current data, the project team consulted websites that are recognized authorities on the subject, based on the quality of their research and their expertise. On the MDGs, it is obligatory to consult the United Nations (UN) website and related search engines, in particular those of the Food and Agriculture Organization (FAO) and their recently published reports, in particular “Edible insects, Future prospects for food and feed security”.
Research should be focused on the need to generate debate in order for visitors to form a critical view on the subject in question, in this case the issue of whether or not insects are a reliable source of energy for the future. However, the most important thing is to conduct sufficient research to combat the myths and prejudices that may exist, and in this case there are many. Influenced by videos and photographs, many people consider eating insects as provocative and, as such, do not see regard this approach as scientifically valid.
Writing
Once the data and information have been collected, it is necessary to compile statistical data for the computer graphics and more detailed information for the wording of the texts (such as the support materials, including the website and the web platform).
One of the team members (full time) wrote the draft version of the contents, which was later shared, improved and approved by the rest of the team (four members/part-time). This is a slow process, but one that is crucial to the success of the partnership and to ensuring that the language used is accessible to all audiences.
Title of the installation
Creating empathy in the visitor is one of the purposes of the message. Therefore, it is important to choose a title for the installation that encapsulates the subject that is being addressed. The title is also essential since it is used in all the supporting materials that are designed to add value to the installation.
6th Step:
Graphic design
The products
The Zero Hunger installation, located in the museum’s dovecote, seeks to bear witness to the need to support causes and policies promoting an effective fight against poverty and food insecurity.
There were two major challenges associated with this installation: the space itself and the need to demystify the use of insects as a food source.
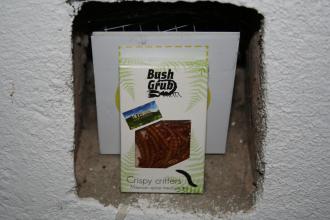
As regards the site, it was an abandoned dovecote in a prime area of the museum. Therefore, it was necessary to breathe new life into that space. With a very limited budget for each installation, the option chosen was to fill each of the loft niches, 57 in total, with edible insect boxes, QR Codes that redirect visitors to videos and reports on new forms of food energy, and illustrative pictures of insects.
Here are a selection of the QR-Code-videos:
- Peter Menzel - Nutrition transition
- Marcel Dicke - Why not eat insects?
- Emma Bryce - Why don't we eat bugs?
- Arnold Von Huis - Eating insects
- Florence Hunkel - Eat less meat, more bugs
- Megan Miller - Are insects the future of food?
The aim was to create something more visual, something that would immediately capture the attention of visitors. Thus, based on the research conducted, we contacted the investigator and professor at the School of Tourism and Sea Technology of Leiria Polytechnic Institute, Dr. Patricia Borges, who approaches this topic by focusing on the use of insect flour meal as an answer to food shortages.
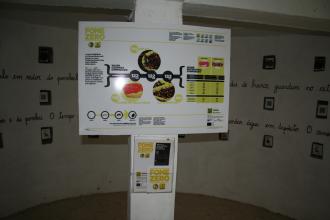
In the view of the professor, it was crucial to have a nutritional table that showed the nutritional value of some types of insects when compared to “regular” food. Although we had not initially envisaged this element, ultimately it proved to be a valuable asset. Therefore, a table in computer graphics format was created that allows the visitor to clarify a number of issues without resorting to the QR videos and the leaflet.
This table enables visitors to compare 100 grams of beef with 100 grams of grasshoppers or 100 grams of mealworms. Once the data is ready for the table, next comes the challenge of transforming the information into something visual. Here it is essential to work with a team of designers able to understand and give life to the data.
Note: once the design is finalized, it is necessary to check the table with the investigator!
Once approved, the table was printed on K-Line board and fixed to the dovecote’s central pillar.
The sheet/leaflet/brochure
The brochure should have a strong visual link to the topic under discussion. In this case, the brochure was designed in yellow tones to match the tone of the official icon of the MDGs. In terms of format, the leaflet is printed on A3 paper that is foldable into six sections, to enable the reverse side to be used as a poster. The choice of picture was a person next to a container of rice, with the name of the installation and a QR CODE directing the visitor to the project’s Facebook page. The inside of the booklet conforms to the required visibility standards.
The leaflet shows a timeline on progress in reducing hunger in the world, the challenges to be addressed and the solutions that the international community can adopt. The approach also includes one of the hottest issues on the international agenda: food waste, focusing on its financial and environmental impact.
The brochure links the location of the installation with the theme and provides ideas on actions that visitors may wish to take. It is essential to ensure that both the local and the international dimensions of the topic are addressed, not only to identify it clearly as a glocal issue (global + local) but also because both the sources used and the materials providing further information are accessed via both international websites and Portuguese websites where the content is in Portuguese.
The sheet also includes a phrase encouraging the reader to take action, showing that even an individual can make a difference.
Insects: Myth versus Reality
Through Internal testing of the message, it soon became apparent that identifying insects as a food source was something that was not immediately acceptable to people. Many myths persisted. We then had the idea of creating a simple table where myths were debunked by reality. We then gathered a set of myths and realities about eating insects and asked the design team to transform this information into a document with a similar design to the other graphic materials. This fact sheet was printed, laminated and made available in the dovecote. More importantly, it was disseminated digitally as widely as possible.
Note: one of the ways to get what you want in terms of design is to write a clear briefing, or set out your concept in the form of a diagram with accompanying written explanations.
Document pouches
To ensure that visitors had sufficient space to move around, it was not possible to set up the totem display stand (for holding the sheets/leaflets) inside the dovecote as previously planned. Instead, the design team suggested attaching a small acrylic pouch where the Myth vs Reality information and the sheets/leaflets could be made available for the public to read.
Notes: since we had only produced one “Myth vs Reality” sheet, we had to fix a label on it making clear that it was for reference only. Before buying adhesives, make sure you have the necessary authorization for sticking materials to walls.
Sign
It is essential to create a sign next to the installation, alerting the visitor to something innovative. The sign was mounted on K-line and fixed to the door outside the dovecote.
Canvas screen
All museums have a map laying out their rooms and the respective exhibitions. So, we decided to create a canvas map displaying the exact location of the installations.
A small note: since it is a time-consuming process, and for environmental reasons, the best option is to wait until the installation has been set-up and tested for a few days. Save your money and only print the screen at the end, since this reduces costs and negative impacts on the environment.
7th Step:
Implementation
After the material had been printed and the exact location was agreed, a suitable date for assembling and installing the installation on-site was identified: the eve of World Food Day (16 October). With the camera in one hand and the drill in the other, the task was started.
In each of the niches was placed either a picture, or a QR CODE, or one insect box. So, the information was distributed evenly throughout the three levels of ancient pigeon nests so as to be as visually effective as possible.
As with any project, the impact on the audience should be measured. Therefore, a manual evaluation system has been created by placing two glass bottles inside the dovecote. One bottle is empty and has the words "Place your vote" written on its label; the other contains small stones that visitors can remove and place in the first bottle, if they have appreciated the installation.
Note: you must agree with museum staff a procedure for gathering and analysing this information. Equally important is ensuring that labels displaying the visibility standards are glued to all materials purchased under the project. It is also important to ensure that the evaluation model is consistent with other evaluation systems that are already in operation.
8th Step:
Dissemination and communication plan
As the project seeks to reach the highest possible number of visitors, a communication plan was drawn up in support of the project and each installation, which identified, in particular, key institutions to contact, communication channels and the type of message to convey. So, in the days leading up to the launch, photos and reports on the subject were disseminated via the Facebook page to create momentum.
Facebook Connected for a Better World
Given its widespread use in Portugal, Facebook is a powerful means of communication. The date, in this case World Food Day, was purposefully chosen in order to give extra impact to the information provided. We should stress that some of the material for further reading listed in the sheet/leaflet, as well as some of the proofs submitted by the designers can only be accessed via the Facebook page, thereby facilitating the work of the head of communications and ensuring a coherent thematic approach to the topic.
Media
It is necessary to understand the impact that the installation has on the media agenda. However, it is still important to prepare and send press releases to the media, especially to the local press.
Flashmails
To enhance the dissemination of the installation, a flashmail was produced with the image of the poster, a brief message on the specific topic, and a summary of the project and the organizations funding it.
The installations must be publicised systematically and, if possible, by all stakeholders and partners involved through the use of their own (internal) communication platforms. Therefore, the installation was widely publicised through the project’s official Facebook page, the IMVF's website and the networks of our partners.
On the opening day and over the following weeks, information and photos related to the topic of MDG 4 were posted online.
In addition, all partners were asked to create a story about the installation on their websites. The capacity of each organization to meet this request depended very much on their internal dynamics. The IMVF, as a development NGO and the project’s national coordinator, had the greatest capacity to post this news on their website. Public institutions have complex structures, which means that their ability to post news is dependent on a number of factors. Nonetheless, it was possible for many of the installations to use the Municipality’s internal communication channels.
The installations must be publicised by using all channels available to the different partners, including international networks and partnerships.
9th Step:
Inauguration of the installation
Invites
For this step, it is necessary to coordinate between all partners on the invitations that you want to send and on who you want to attend the installation’s inauguration. It is important to take photos to record the moment for posterity and, if possible, get some statements from those present. Even if you choose not to have a formal inauguration, you should always invite the team members, so they can witness the installation at first hand.


