privacy policy and liability | legal notice english português České deutsch

GLOBAL TEXTILE INDUSTRY

WHO SEWS YOUR CLOTHES?


Summary

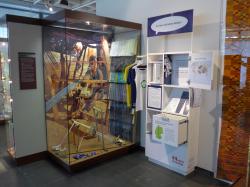
The first Museo Mundial Project installation that has been installed in the Naturhistorisches Museum in Nuremberg aims to shed light on the issue of the Global Textile Industry. The object in the shape of a wardrobe has been set up [on a wall in the West Africa section between a statue of a king and a showcase displaying traditional hand weaving in Ghana.

The object aims to extend the topic of textile production by adding the global dimension of the industrialized textile industry. It raises the following questions. Do you know where your clothes come from? Or where they have been produced, by whom and under what kind of working conditions?

Details

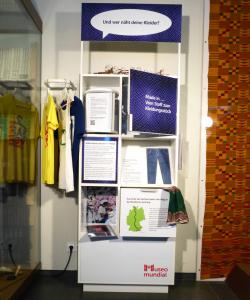
The innovative tool provides information on the global textile industry by interacting with the visitor’s senses:

  • The visitor can touch cotton flowers and study the history of "White Gold".
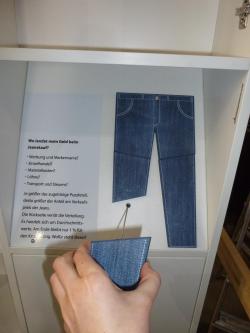
  • A jigsaw in the shape of a pair of jeans invites the visitor to guess how the price we pay for a pair of jeans is distributed throughout the different stages of production. In this way, he/she is informed about the uneven distribution of money in the textile industry.
  • A photo book provides information on precarious working conditions using examples from Southern India, China, Bangladesh and Cambodia. The visitor can read the case studies and thereby gain knowledge on the worldwide exploitation of (underage) textile workers, the (health) risks of working in a textile factory and the environmental damage caused by the use of chemicals in the textile production process.
  • Besides informing the visitor about the journey made by each piece of clothing, working conditions and the global inequality in salaries, the object also suggests how best to act as a consumer. Therefore, the wardrobe includes information on the alternative approach of upcycling. The visitor can take home a flyer that provides addresses of local shops and online shops with a range of upcycled clothes, as well as an instruction manual that teaches him/her how to upcycle a worn-out man's shirt into a trendy tunic. The visitor is thereby empowered to choose upcycling as an alternative approach to consuming in everyday life.
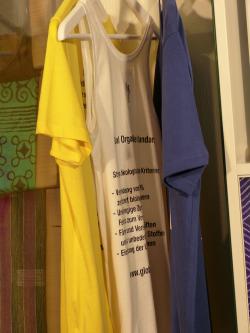
  • The visitor can also find information on fair trade shopping and fair trade certifications. Three T-shirts hanging on a clothes rod explain the different fair trade labels and their positive impact on the clothing industry. The visitor in his/her role as a consumer is empowered to take an informed decision on what textile product he/she wants to consume taking into account the information on global textile production provided by the interactive wardrobe.
  • This tool aims to shed light on two Millennium Development Goals (MDG), namely MDG 1 ("Eradicate extreme poverty and hunger") and MDG 7 ("Ensure environmental sustainability"). The explanation of the chain of custody for textile production offers many opportunities to highlight both environmental sustainability and MDG target 1B ("a decent life for all").
20140513aklein001

Overview of the installation on global textile production

Front view of the installation on the global textile industry

jeanspuzzle

Jigsaw on the price of a pair of blue jeans

Three T-shirts explain fair trade labels and their positive impact on the clothing industry

    Budget + resources

    Budget needed:

    Construction of the wardrobe

    1200€

    Design of the overall tool

    800€

    Printing of the overall design

    150€

    Copy-editing of the overall design

    60€

    Usage of photography

    150€

    Picture book / proofreader

    40€

    Picture book / printing

    50€

    Fair trade T-shirts

    50€

    Fair trade T-shirts / printing

    80€

    Upcycling flyer / printing

    30€

    Transport of the wardrobe

    150€

    Cotton flowers

    Available at the museum

    Total

    2860€

    How to do it step by step

    1st Step: 
    Choose object and topic

    Conjointly choose the object and the topic that you want to work with. The type of learning tool chosen depends very much on the specific museum and its objects. Types of objects that might possibly be linked to this development topic include traditional clothes, robes, weaving machines, cotton, and instruments and plants used for dyeing cloth.

    Try to create a comprehensible and clear connection to existing objects in the museum.

    → Try to stay as close as possible to the thematic focus of the object that you want to work with.

    Choose an aspect of the topic that strikes the right balance between being complex enough and sufficiently well-defined. Do you want to provide an overview of the global textile industry? Would you like to concentrate on a certain part of the story? Which part?

    → As the global textile industry is a huge and complex topic in which you could easily get lost, we recommend that you concentrate on a certain aspect of it. You could choose, for example, working conditions in textile factories, the story of cotton and why it is known as White Gold, the unequal distribution of wages, or alternative approaches like fair trade labels or upcycling.

    Develop interesting methods for implementing your idea. Check how much space will be available at the museum, what technical facilities the museum can offer, which target group you want to address, and how much money you have to invest.

    → Think small and start small. In the process of implementing your project, new ideas will be generated, so be sure to hold back some money for investing in the latter stages of the process!

    2nd Step: 
    Produce a first draft

    Produce a first draft of your idea, bringing together your ideas and those of your partners. This draft should already include a budget plan so that you can assess the practicability of your idea. It should also include an implementation schedule. Produce a draft that everyone agrees with and then send it to all partners.

    → Include every single stage of the production process and be careful not to forget small details. For example, it may seem convenient to list only "production of picture book: 50 €", but bear in mind that you might also want to pay for a proofreader, a designer, copyrights, laminated paper and postage for sending the book to the museum. Once you add all these costs together, you may find that this step will be more expensive than you thought (in our case it cost 130 €).

    3rd Step: 
    Quotes

    Ask for quotes for every stage of the production process. Try to obtain several quotes for each stage, so that you can choose the best option. Add up the quotes and compare this to your budget plan, adjusting the plan as necessary. Choose your suppliers.

    4th Step: 
    Create content

    Create and write down the content for the information panels on the wardrobe (or whatever object you choose). Ask your partners to proofread this first version so that you can clarify any misunderstandings at an early stage.

    Choose pictures, graphics and videos that reinforce the content. Ask the copyright owners for permission to use their material for educational purposes. In some cases, you might have to pay for using this material.

    Construct a dummy of the wardrobe/tool that you have in mind. You can use cardboard, LEGO or something similar. Visualizing the object in this way helps to raise questions for discussing with the carpenter. It also helps to put the size of each component of the tool into perspective.

    5th Step: 
    First draft to carpenter and designer

    Send a first draft to the carpenter that includes the desired size of the object, your text and pictures so that he/she can draw up a blueprint (technical drawing). Send the blueprint to the designer so that he/she can start working on the general layout.

    → Start communicating with the carpenter and the designer as soon as possible, since the concept will take some time to development.

    6th Step: 
    Finalize concept

    Finalize the concept, as required by the carpenter, namely the text, pictures and any other methods that you wish to incorporate. Ask your partners to do a final proofread. Pay for a professional proofreader if you allowed for this in your budget plan. Send this concept to the designer.

    → Identify the "standalone extras" that might be added to the object afterwards. In our case, these were: a photobook on precarious working conditions (in Bangladesh, India, China and Cambodia), three T-shirts with fair trade labels (GOTS, TransFair and FairWear), a washing label installation and flyers providing information on upcycling. At this 6th step, concentrate on the main content, since the "extras" can wait.

    7th Step: 
    Final quality control

    Correction loops: the use of several correction cycles will professionalize the final product. Ask the designer for two or three checks. Identify the representatives from the museum that need to give their blessing to the final product. Try to keep this circle small to save time. Make the correction process transparent to all actors.

    At the same time, finalize the "extras". When the main object is completed, you can concentrate on the smaller extras (for example, in our case the picture book was an extra). You will need to contact the proofreader, designer and print shop again, which will take time.

    If you want to develop a picture book on precarious working conditions, allow time for research, copyright requests and for the circle of proofreaders to check it.

    The explanatory text about the fair trade labels printed on the T-shirts (fair trade ones, of course) took time to produce, and additional time for those people ultimately responsible to give their blessing to it.

    → And how did we obtain so many washing labels? Well, we asked our colleagues and friends to cut out their washing labels, which was both fun and educational.

    8th Step: 
    Transport to museum

    Finalize everything. Once you have given the "go ahead", the designer will send the final design to a print shop, and the printed design will be sent to the carpenter. The final product must be transported to the museum. Find a reliable trucking company. Also, you might find it useful to ask the carpenter’s advice on how best to protect a wood installation against damage in transit. Experienced carpenters can build a box for transportation, if so requested.

    → Bear in mind that communication between the carpenter, driver and museum is key. It might be useful for those three to exchange numbers. Both the carpenter and the museum will want to know at what time the trucking company will arrive to ensure that someone will be there to meet them.

    Evaluation

    Ups & Downs

    Ups

    • The use of the wardrobe as an installation complemented the topic of textile production. Our experience with this tool has demonstrated that when the topic and the installation  complement each other, this increases the impact on visitors.
    • A complex installation like the wardrobe allows different educational methods to be implemented in one place.
    • Different viewing areas and levels within the wardrobe can reach target groups of different ages.

    Downs

    • Developing a complex installation takes longer.

    Lessons learned

    • Plan your budget with a buffer: during implementation unpredictable events can change plans. For example, during the implementation of our tool, we realised that the jigsaw design would not work as planned. That meant we had to ask the designer to adapt the jeans, reprint some of the stickers and have the carpenter alter the wardrobe.
    • One topic - in this case textile production – has many facets. We tried to touch on them all. That is, however, not advisable. Try to break down your topic of interest into one aspect that you would like to explain.

    Feedbacks from visitors

    • Analysis is ongoing.

    Internet links + other sources

    Clean Clothes Campaign:
    www.cleanclothes.org (last accessed 2014/06/02)

    Clean Clothes Campaign: Asia Floor Wage / Living Wage:
    www.cleanclothes.org/livingwage (last accessed 2014/06/02)

    Clean Clothes Campaign (2012): Deadly Denim – Sandblasting in the Bangladesh Garment Industry
    www.cleanclothes.org/resources/publications/ccc-deadly-denim.pdf (last accessed 2014/06/02)

    Clean Clothes Campaign (2013): Breathless for Blue Jeans. Health hazards in China's denim factories
    www.cleanclothes.at/media/common/uploads/download/breathless-for-blue-jeans-health-hazards-in-china-s-denim-factories/Report_Breathless_130703.pdf (last accessed 2014/06/02)

    Ethical Trade Initiative:
    www.ethicaltrade.org (last accessed 2014/06/02)

    Fairtrade Labelling Organizations International, e.V:
    www.fairtrade.net (last accessed 2014/06/02)

    Fair Trade Center (2012): Still Fashion Victims? - Monitoring a ban on sandblasted denim
    www.fairtradecenter.se/sites/default/files/English version_Still fashion victims Monitoring a ban on sandblasted denim (2012)_0.pdf (last accessed 2014/06/02)

    FairWear Foundation:
    www.fairwear.org (last accessed 2014/06/02)

    Global Organic Trade Standard:
    www.global-standard.org (last accessed 2014/06/02)

    Greenpeace (2012): Toxic Threads. Putting Pollution on Parade
    www.greenpeace.org/international/en/publications/Campaign-reports/Toxics-reports/Putting-Pollution-on-Parade/ (last accessed 2014/06/02)

    International Labour Organization (ILO):
    www.ilo.org (last accessed 2014/06/02)

    Worker Rights Consortium:
    www.workersrights.org (last accessed 2014/06/02)

     This website has been produced with the assistance of the European Union.
    The contents of this publication are the sole responsibility of the Museo Mundial project partners and can in no way be taken to reflect the views of the European Union.

     EU